Mermaid is a JavaScript based diagramming and charting tool that renders Markdown-inspired text definitions to create and modify diagrams dynamically.
It can handle
- Flowcharts
- Sequence Diagram
- Class Diagram
- ER Diagram
- User Journey
- Gantt
- Pie Chart
- Requirement Diagram
- Gitgraph Diagram
- C4C Diagram
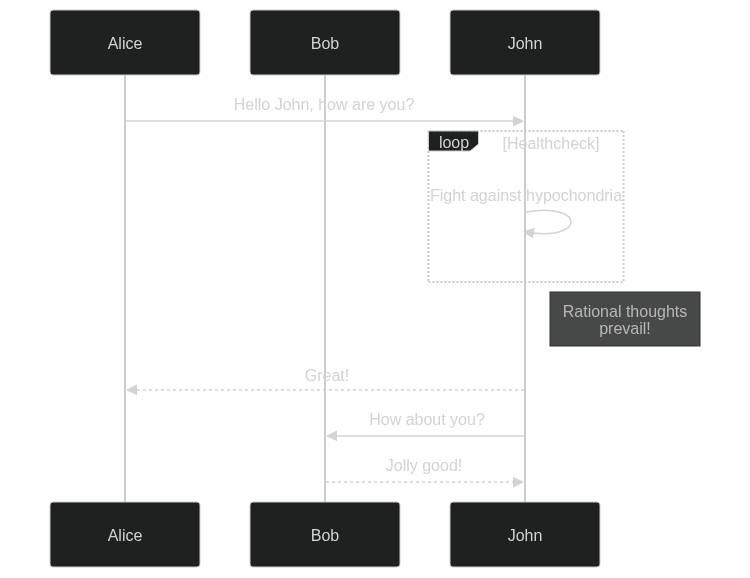
Example Sequence Diagram:
sequenceDiagram
    participant Alice
    participant Bob
    Alice->>John: Hello John, how are you?
    loop Healthcheck
        John->>John: Fight against hypochondria
    end
    Note right of John: Rational thoughts <br/>prevail!
    John-->>Alice: Great!
    John->>Bob: How about you?
    Bob-->>John: Jolly good!
Github and github pages support
Github now natively supports mermaid, see this article. All you have to do is to mark a code block with mermaid:
graph TD
A[Client] --> B[Load Balancer]
B --> C[Server1]
B --> D[Server2]
However, this will not work in your local Jekyll deployment. Also, it does not work on Github Pages. The basic problem is:
- Github requires a code block with language tag
mermaid, which translates to:
<code class="language-mermaid">
    ...
</code>
whereas the local solution and Github Pages require a pre element of class mermaid.
<pre class="mermaid">
    ...
</pre>
Attempt 1: additional class on code block
The first idea was to augment the code block with the class mermaid:
{.mermaid}
...
However, the generated code was:
<pre class="mermaid"><code class="language-mermaid">graph TD
A[Client] --> B[Load Balancer]
B --> C[Server1]
B --> D[Server2]
</code></pre>
This caused mermaid to throw an error, since it did not recognise the <code> block.
Attempt 2: only code block
We tried a code block with two classes:
<code class="mermaid language-mermaid">
...
</code>
Display:
graph TD
A[Client] --> B[Load Balancer]
B --> C[Server1]
B --> D[Server2]
Again, we get a mermaid error locally and on Github Pages since it is not a pre html element.
Test with element
Using a pre html element will display fine locally and on Github Pages, but not on Github:
<pre class="mermaid language-mermaid">
...
</pre>
graph TD
A[Client] --> B[Load Balancer]
B --> C[Server1]
B --> D[Server2]
Using mermaid locally
I looked at the Github plugins and Jekyll plugin. However, they don’t work in github. So I followed the Mermaid HTML Tutorial.
- Define a the file
mermaid.html in _includes:
<script type="module">
import mermaid from 'https://cdn.jsdelivr.net/npm/mermaid@10/dist/mermaid.esm.min.mjs';
mermaid.initialize({ startOnLoad: true });
</script>
{% include mermaid.html %}
in the relevant posts, include it: {% include mermaid.html %}.
Now mark the diagramm with the element <pre class="mermaid">. Unfortunately, normal code blocks translate to <code class="language-mermaid">, which is not caught by the mermaid initialize function.
Example:
<pre class="mermaid">
graph TD
A[Client] --> B[Load Balancer]
B --> C[Server1]
B --> D[Server2]
</pre>
Leads to this graph:
graph TD
A[Client] --> B[Load Balancer]
B --> C[Server1]
B --> D[Server2]
Online Editor
There is an online editor which allows you to draw diagrams and then store them and reference them as a picture - the markdown link can be downloaded. The following graph has been generated like this:
Minimum index.html
A minimum Mermaid project looks like this in index.html:
<html>
<body>
Here is one mermaid diagram:
<pre class="mermaid">
graph TD
A[Client] --> B[Load Balancer]
B --> C[Server1]
B --> D[Server2]
</pre>
And here is another:
<pre class="mermaid">
graph TD
A[Client] -->|tcp_123| B
B(Load Balancer)
B -->|tcp_456| C[Server1]
B -->|tcp_456| D[Server2]
</pre>
<script type="module">
import mermaid from 'https://cdn.jsdelivr.net/npm/mermaid@10/dist/mermaid.esm.min.mjs';
mermaid.initialize({ startOnLoad: true });
</script>
</body>
</html>
Plugins
There are two plugins:
- jekyll-mermaid of 2014
- jekyll-mermaid-diagrams of 2019.
Unfortunately, both don’t work on github.
Mermaid and Hugo
It turns out, that mermaid support is a lot easier in the static web site generator Hugo. It is explained in the Hugo hooks documentation.
You have to add a layout partial file: layouts/partials/mermaid.html with the following content:
<script type="module">
import mermaid from 'https://cdn.jsdelivr.net/npm/mermaid/dist/mermaid.esm.min.mjs';
mermaid.initialize({ startOnLoad: true });
</script>
In addition, this script has to be included in the header themes/XXX/layouts/partials/extend_head.html:
{{ if or .Params.mermaid .Site.Params.mermaid }}
{{ partial "mermaid.html" . }}
{{ end }}
Next, we extend the code block languages with mermaid in layouts/_default/_markup/render-codeblock-mermaid.html:
<pre class="mermaid">
{{- .Inner | safeHTML }}
</pre>
Now, all you have to do on your page is to define mermaid in the frontmatter:
---
...
mermaid: true
---
and then use a code-block with language mermaid.
For example, the code block below:
graph TD
A[Client] --> B[Load Balancer]
B --> C[Server1]
B --> D[Server2]
will render like this, if it has the language tag mermaid:
graph TD
A[Client] --> B[Load Balancer]
B --> C[Server1]
B --> D[Server2]
Conclusio
Since I use mermaid mainly not to document code, but to end up on Github Pages, I ended up using the <pre class="mermaid"> approach with Jekyll, as described in above and ignore that it is not displayed on Github.
For Hugo, the implementation was much more straight forward.